Remote Desktop gives you command of a fleet of Macs. Track hardware and software, observe and control screens, change settings, install apps and copy files to multiple Macs at once… all from one place.
Successfully implementing remote management means planning ahead. Create an admin account on each computer for this purpose. It should not be an account the user will use. Keep this information private so users cannot circumvent it. In fact, we recommend making the other user accounts “standard” – that is, not admin accounts. Only the tech and management should have admin access to the computers. This puts them in charge of all software installation and configuration and allows them to maintain consistency.
Before you can add a Mac to your Remote Desktop console, configure it for remote management.
Adding Macs to Remote Desktop Admin
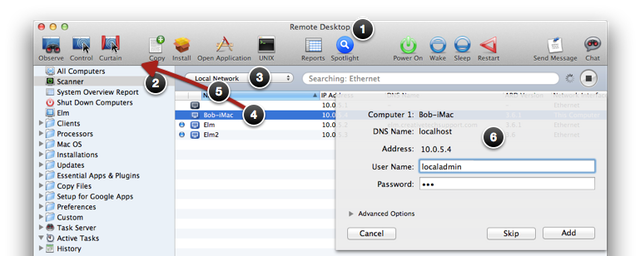
- Open Remote Desktop on the server or admin computer.
- Click Scanner.
- Choose Local Network.
- Select the computer(s) to be added.
- Drag them to All Computers or a group on the sidebar.
- Type the standardized user name and password and click Add.
Can’t connect even when Remote Management is on?
You can “kickstart” the remote management service. Go to the affected computer, log in as an administrator, and open Terminal. Type or copy/paste the following command:
sudo /System/Library/CoreServices/RemoteManagement/ARDAgent.app/Contents/Resources/kickstart -activate -configure -access -on -restart -agent -privs -all
Then hit return and type the admin password.
If you’re on a different computer, try connecting through ssh.
ssh localadmin@ipaddr (replace with the actual admin user and IP address or computername.local
Hit return and type the admin password, then try the kickstart command above.
Back to Apple IT reference guide