Configure a router to allow access to computers, devices and services when you are outside the office. These instructions help you forward traffic coming from the internet through particular ports to certain devices on the local private network.
Static & dynamic addresses
Your public IP address is assigned by the ISP and might change from time to time. People will use your current public IP address to find you on the internet. You might want to obtain a static IP from your ISP or a custom domain name (such as mycompany.org). DynDNS is another alternative.
Finding your public IP address
- Open Safari.
- Go to www.speedtest.net.
- Test your internet speed. You'll probably want at least 5 megabit – the faster the better.
- Make a note of the public IP address in the lower left corner of the graph, above the ISP name. You can click it to copy to the clipboard.
Changing your router settings
Routers typically assign address to devices on your private network automatically. These are dynamic IP addresses - they change. It's harder to connect to a device such as a server if its IP address changes. You'll need to alter the router's automatic IP assignment to allow for static (manual) addresses.
The first part of the IP address is dictated by your router (10.0.0.x or 192.168.0.x, for example). You choose the last digit for the device, which needs to be outside the DHCP range so the router doesn't try to assign a duplicate address. We recommend starting with IP x.x.x.2 (e.g., 10.0.3.2).
If you know none of the devices on your network have static IP addresses yet, it's helpful to also adjust the third number in the sequence to avoid conflicts. For example, 10.0.1.x is quite common, so you might want to use 10.0.3.x instead. That way a person whose own network uses 10.0.1.x doesn't have a problem connecting to your network.
Apple AirPort router or Time Capsule
Apple’s AirPort utility makes configuring the router easy. You can run it from any Mac on the local private network. You'll need the router's administrator password to make changes. If you use another router, see Other routers below.
- Click the Finder, then click the Go menu at the top of the screen and choose Utilities. Open AirPort Utility.
- Select the primary AirPort router (the first one under Internet) and click Edit. Log in as the router administrator.
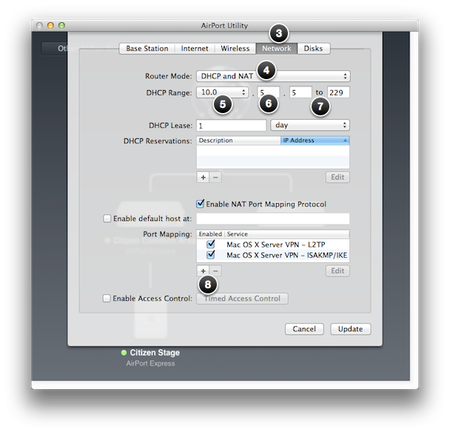
- Click Network.
- Set the router mode to DHCP and NAT.
- Select a standard DHCP range from the list. If you already have devices with static IPs, don't change this value.
- Set the third digit to a number greater than 1. If you already have devices with static IPs, don't change this value.
- Set the range for the last number. We recommend 5 to 229. This allows 3 static IP addresses for devices (2, 3 & 4) and 225 dynamic devices.
- To route internet traffic to a device, click the + under Port Mapping.
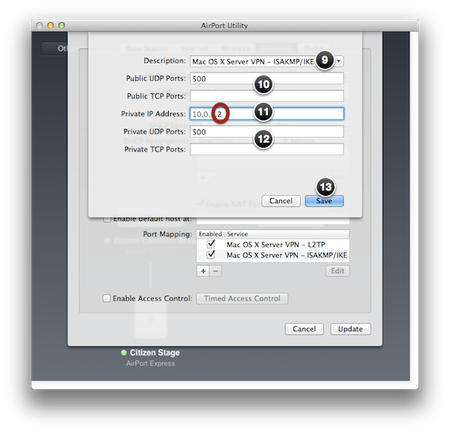
- Choose a standard service from the Descriptions, or type your own. For Mac OS X VPN, see Mapping to OS X Server VPN below.
- Check the public UDP and TCP ports. If they are not automatically filled in with the correct values, add them. You can find common ports listed online or with the device's documentation.
- Type the server/device’s private static IP address.
- The private UDP and TCP ports should usually match the public ports. Enter them here.
- Click Save. Repeat steps 8-13 for additional services, ports and devices.
- Click Update and wait for the router to save and reboot.
Mapping to OS X Server VPN
OS X Server is software that lets you share files with other Macs, Windows and iOS devices. Or back up a network of Macs to a shared Time Machine drive. Centralize management of Macs and iOS devices. Serve up web pages, email, calendars, contacts and wiki pages.
OS X Server includes VPN – a secure virtual private network that lets people access all network services from outside the office. Server is just a $19.99 add-on to OS X. Purchase Server in the App Store. You pay only once for all the Macs you use.
If you’re using OS X Server, you'll need to configure your router so three ports are mapped (forwarded) to your server.
- OS X Server VPN - L2TP (UDP port 1701)
- OS X Server VPN - ISAKMP/IKE (UDP port 500)
- OS X Server VPN - NAT Traversal (UDP port 4500)
Then see Configuring OS X Server VPN.
Other routers
Other routers are a little tricky. If you don't know your router's password, search online for your router name & model and "default password." If all else fails, you can reset the router to factory default settings by holding the reset button for 30 seconds. Do this only if you know how to reprogram your router from scratch (not covered here). Other routers vary and you may need to consult your model's documentation, which can be found online.
- Open a web browser from any computer on the local private network.
- Type the router’s private IP address.
- Log in as the router administrator.
- On the router page, look for the LAN settings.
- Set the starting DHCP range to 5. For example, if your local network is 10.0.3.x, set it to 10.0.3.5. This allows 3 static IP addresses for devices (2, 3 & 4).
- If no devices are using static IPs yet, set DHCP Range to 10.0.3.5 to 229. Otherwise, change just the last number. This allows 3 static IP addresses for devices (2, 3 & 4) and 225 dynamic devices. If the router won't accept 229, use 199.
- On the router page, look for port forwarding. It might be under network, LAN, firewall or advanced. Port forwarding opens services to remote users through the internet.
- Add a port forwarding entry. You can find common ports listed online or with the device's documentation. For Mac OS X VPN, see Mapping to OS X Server VPN.
- Type the server/device’s private static IP address.
- The private UDP and TCP ports should usually match the public ports.
- Repeat steps 8-10 for additional services, ports and devices.
- Save the changes and reboot the router.
Get more help with Networking.