Customizing general Mail settings
- Open Mac Mail.
- Go to the Mail menu and choose Mail preferences.
- Click the General button, set default email app to Mail.
- Click the Viewing icon and check Show contact photos in the message list.
- Under View conversations, check Include related messages.
- Close the preferences window.
- Click the Inbox.
- Click the Edit menu and check Attachments-Always insert attachments at end of message.
Customizing the main toolbar
- Click the View menu and Customize Toolbar.
- At the bottom, choose Show Icon and Text.
- Drag New Message to the left of Delete.
- Drag Move to the right of Junk.
- Drag Archive to the right of Move.
- Drag Flag to the right of Forward.
- Drag Add Sender to the right of Flag.
- Choose Show Icon and Text, then click Done.
- Enlarge the window, making it large enough to see the Search box in the toolbar.

Customizing the new message toolbar
- Click the New button.
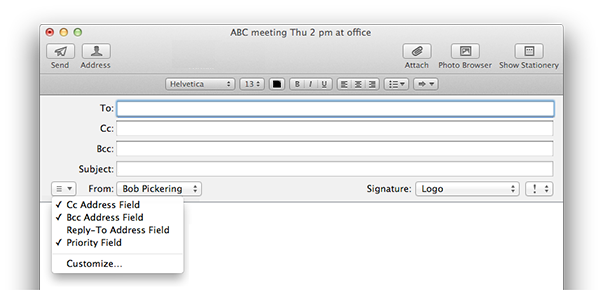
- Click the popup menu to the left of From and check BCC and the Priority menu.
- Click the View menu and Customize Toolbar.
- At the bottom, choose Show Icon and Text.
- Drag Format to the right of Address.
- Drag Lists to right of format.
- Choose Show Icon and Text, then click Done.
Send a test email
- Click the Window menu and choose Connection Doctor.
- Wait for the tests to complete. There should be a green light next to each item in the list; a red light means the test failed.
- You’ll see an explanation of any problems and what to do. Double-click the error message to correct it. See Fixing Mail errors.
- Address a message to yourself, put Test in the subject line and type Command-S to save it.
- Now click send.
- Verify that the message sends and is received.
Creating a signature
- Open Mac Mail.
- Go to the Mail menu and choose Mail preferences.
- Click the Signatures button.
- Highlight an email account and click the + button.
- Type a description for the new signature.
- In the space at right, type [return] and your signature.
- Close the preferences window.

Signature tips
- Signatures don’t show when you create a new message? Open Preferences, click Signatures and drag a signature to the email account you want to use it with.
- To automatically add a signature to each message, click an account in the left column, then click Choose Signature and select a signature.
- Type Command-B to turn bold on or off.
- Paste text from another app if you want to use special styles.
- Use common web fonts. Your choice of font may not be displayed for all recipients.
- You can drag or paste a logo or other graphic into the signature. The graphic should be small (less than 3K) since it will be added to all messages with this signature. PNG format works best.
Learn more about email & iCloud.