If users prefer to work in Microsoft Outlook for Windows they can access their Gmail and Google Apps-hosted mail in Outlook alongside their other email accounts. All accounts share a common address book and it’s not necessary to keep the Gmail browser page open. We’ll use IMAP for two-way sync with the Google webmail cloud and smart phones configured for Gmail. Instructions below are for Outlook 2010 unless indicated otherwise.
These instructions are for free Gmail and Google Apps Standard accounts but they work with any Google configuration. If you have a Google Apps for Business account you might prefer to use Google Apps Sync instead – it supports syncing email, contacts & calendars.
Before you can access your Google-based email in Outlook, you need to log into the account in a web browser and allow “less secure apps.” See instructions.
Creating a new identity
When several people use the same Windows login on a single Windows account, create a new identity for each user to keep their messages separate. If only one person uses this PC, or each has their own Windows login, skip this section.
- Open Microsoft Outlook.
- Choose an identity or click New.
- Type the user’s name and click OK.
- When asked to configure a new email account, select No and click Next.
- Select Continue with no e-mail support and click Finish. We’ll set up email in the next section.
Setting up Outlook for Google Mail
- Open Microsoft Outlook. Choose an identity if asked.
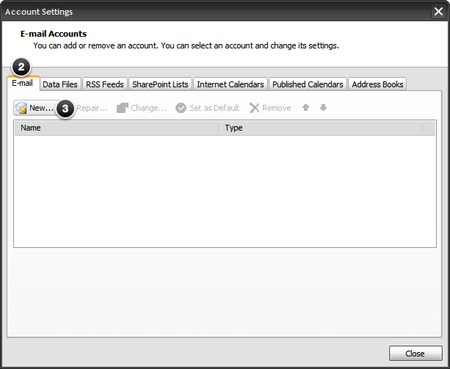
- Click File, then Info (Tools-Account Settings in Outlook 2007).
- Click Add Account and Email (click New in Outlook 2007).
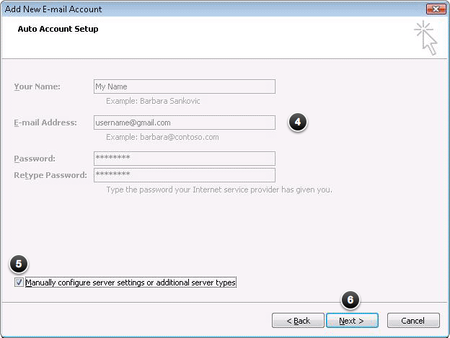
- Enter the full name, email address, and password.
- Check the box to Manually configure server settings or additional server types.
- Click Next.
- Select Internet Email and click Next.
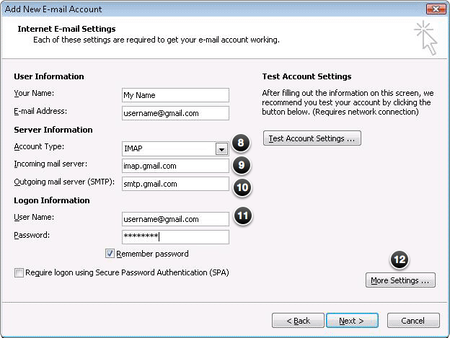
- Change the account type to IMAP.
- Incoming mail server is imap.gmail.com
- Outgoing mail server is smtp.gmail.com
- Enter the user name (email address) and password.
- Click More Settings.
- On the General tab, change the Mail Account description to Gmail or the company name.
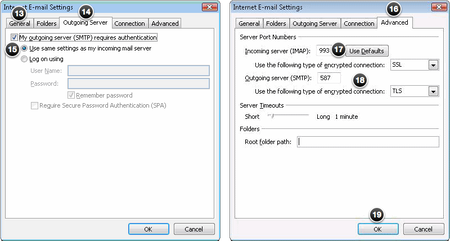
- Click the Outgoing Server tab.
- Check the box My outgoing server (SMTP) requires authentication.
- Click the Advanced tab.
- For incoming server, choose the encrypted connection SSL and set the incoming server (IMAP) to 993.
- For outgoing server, choose the encrypted connection TLS and set the outgoing server (SMTP) to 587.
- Click OK and Test Account Settings.
- If the test completes successfully, click Close, then Next and Finish, then close.
- Click the arrow next to Gmail or the company name in the left column to reveal the folders inside. Click the + button next to [Gmail].
- Right-click the Inbox under [Gmail] and choose Add to Favorite Folders.
- Right-click the Sent Mail under [Gmail] and choose Add to Favorite Folders.
- If there are empty Inbox or Sent Items folders under Favorite Folders, right-click each and Remove from Favorite Folders.
Customizing email settings
- Click File, then Info and click Account Settings (Tools-Account Settings in Outlook 2007).
- Select the Gmail/Google account (which may be named after your company) and click Set as Default if it’s not already the default.
- Double-click the Gmail/Google account. In Outlook 2010 only, uncheck Test Account Settings.
- Click More Settings.
- Click the Sent Items tab. Choose Do not save copies of sent items. (In Outlook 2007, click Folders. Then click Choose an existing folder to save your sent items in. Click the + next to the [Gmail] folder to show its contents and select Trash. Click OK.)
- In Outlook 2010 only, Click the Deleted Items tab. Click Move deleted items to the following folder on the server. Click the + next to the [Gmail] folder to show its contents and select the Trash.
- Don’t see folders in step 6? Click More Folders, click Query and then click OK and OK again.
- Click Next and Finish.
Setting Outlook to download items for offline viewing
This section is optional. It allows laptop users to access folders of downloaded mail even when they’re not connected to the internet.
- Click Send/Receive (Tools-Send/Receive in Outlook 2007), then Send/Receive Groups and Define Send/Receive Groups.
- Select the group All Accounts. Set Outlook to Schedule an automatic send/receive every 5 minutes.
- Click Edit. Select the Gmail/Google account on the left.
- Check the box next to each folder you need offline access (perhaps all of them).
- Click Download complete items including attachments. Click OK.
Tip: Don’t see a Google label in Outlook? Right-click the Google account in Outlook’s folder list and choose Update Folder List.
Learn more about using Google apps with Windows & devices.