Creating a signature or vacation responder
Customize your emails by automatically adding a signature at the end of each message.
Or if you are unable to check your messages for a while, turn on a vacation responder that automatically tells people you are away.
- Sign into Google. Make sure you’re using the correct account.
- Switch to the Mail app.
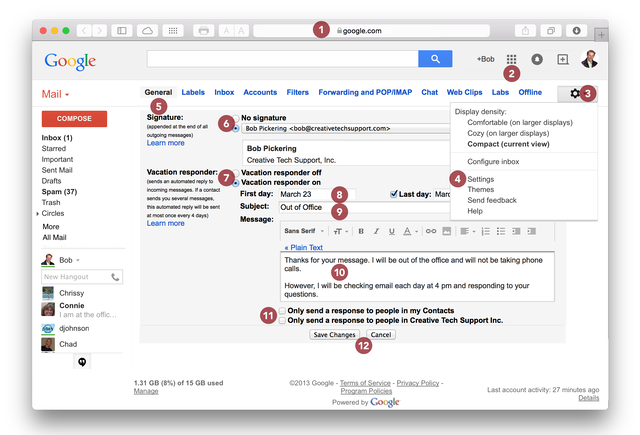
- Click the gear icon at the top of the page.
- Click See all Settings.
- Click General.
- You may create a signature that will be added to the end of each message you send from the web interface. Scroll down to Signature and click + Create new. Give it a name (like Standard) and Create. Use the edit functions to customize your signature or paste a graphic. Be sure to set options to use the signature for new emails and on reply/forward.
- Or turn on a vacation responder.
- For Vacation responder, set a start and end date.
- Add a subject.
- Type a message to send people while you’re away.
- Do not check Only send a response to people in my Contacts or your company.
- Click Save Changes or Cancel.
You may continue receiving and replying to messages while your vacation response is active.
Setting forwarding options
While you’re away (or at other times) you can forward messages to another email address.
- Sign into Google. Make sure you’re using the correct account.
- Switch to the Mail app.
- Click Settings at the top of the window. It looks like a gear icon.
- Click Settings.
- Click Forwarding & POP/IMAP. Here you can choose from a list of forwarding addresses you’ve used before or turn off forwarding.
- No addresses listed? Click Add a forwarding address.
- Type the forwarding email address and click Next.
- Click Save Changes or cancel.
You may check your Gmail and reply to messages even if they are also being forwarded to another address.
The first time you use a new forwarding address you might see a message that authorization is required from the other account. You (or the other person) may need to click a link in the confirmation email. Then you can repeat the steps 1–5 above to select the address and start forwarding.

Learn more about Google web apps.