Search and browse fonts, then preview and activate them to add to your font menus immediately. FontExplorer stores all fonts on the server so every designer has exactly the same set of fonts. Note: These instructions are for organizations using FontExplorer Server. For stand-alone users, please see these instructions instead.
You’ll use Linotype FontExplorer to access the master font library on the server. Search and browse fonts, download them to your Mac's FontExplorer, then preview and activate them to add to your font menus immediately.
FontExplorer X Pro looks like a child’s toy block in the dock. If you have FontExplorer Pro, don’t use the OS X Font Book, Font Agent, Suitcase or other font apps which may interfere with FontExplorer Pro.
![]()
Don’t have FontExplorer? You’ll need to download, install & license it before moving on to the next section.
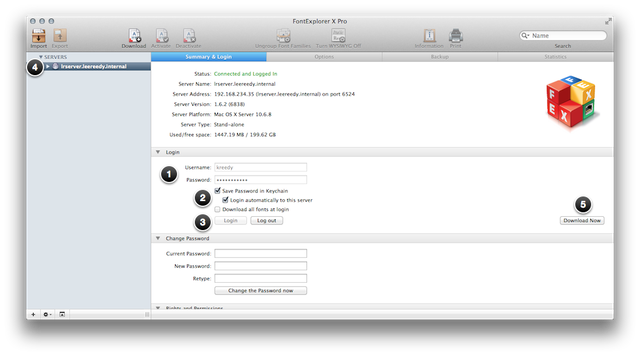
Logging into FontExplorer Server
The first time you open FontExplorer you may need to log in. If you see a message that you need to reconnect, here’s how:
- Type your username (usually the first part of your email address) and password. Ask your administrator if you don’t know the password.
- Check the boxes to save the password and login automatically so you won’t have to type them again.
- Click Login.
- Click the triangle to the left of the server name to see the font library underneath.
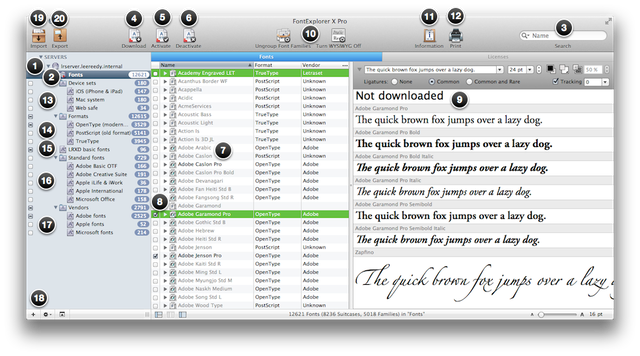
Browsing, previewing and activating fonts
- Click the triangle to the left of the server name to see the font library.
- Click Fonts to browse or search the entire font library.
- Search for a font by name or other criteria by typing in the search box.
- Select font families and click Download to keep the font on your Mac.
- Click Activate to add selected fonts to your apps. Note: you need to quit and relaunch Microsoft to update font menus.
- Click Deactivate to remove the font from your apps. It remains downloaded on your Mac for next time.
- Fonts in dark print are already downloaded to your Mac. Gray fonts are on the server waiting to be downloaded.
- Check the box next to a font to download and activate the font in one step.
- View a sample of the selected fonts on the right. You can type your own text, change sizes, color and background. Fonts must be downloaded before you can sample them.
- Click Ungroup Font Families to show each style separately. Now you can see font names in their own font, or turn off WYSIWYG (what you see is what you get) for standard listing.
- Click Information to see larger samples and every detail about the font, from the vendor, history, classification & uses - even which keys to press to type a specialized character. (See image below.)
- Print sample sheets of the selected fonts.
- Click the triangle next to Device Sets to choose from standard web, Mac and iPhone/iPad fonts.
- Browse fonts by format. OpenType is the modern Mac & Windows font format that include fractions, ligatures, alternate characters, swashes, small caps and more. TrueType is a good choice for building a Microsoft Office file or a web page. PostScript is an obsolete format from the 80s and 90s but they still work on Macs today.
- Custom sets let you group fonts by client, project or usage.
- Standard fonts come with Adobe, Apple & Microsoft products.
- Vendors shows all the fonts from each major manufacturer.
- Click the + button to create a new font set on the server. Then drag fonts from one of the other sets to organize fonts into a custom group. The set will be available to all other users.
- Click Import to add more fonts. Select the font files and they are added to the server library.
- Click export to save copies to transfer to another computer. Or drag fonts to your desktop or use your app’s Package function (found in InDesign and other apps) to make copies of the fonts needed for your project.
You should leave Font Explorer Pro open as you work – it may deactivate fonts when you quit. Just minimize or hide the window. Accidentally quit? Relaunch the app and the previously active fonts are automatically reactivated.
When you open a document, most fonts are automatically activated. Special plugins are installed for Adobe apps to help you get the right font and reduce the need to visit FontExplorer (as long as it’s running in the background). Your fonts even stay active even if you restart. If some of your favorite fonts are not in the font menus, just open FontExplorer and check the box next to the ones you use most.
Missing a font? If you notice any fonts are completely missing from FontExplorer, search for them on your computer (using Spotlight's magnifying glass in the upper right corner of the screen. Drag the font files to your desktop. Then open FontExplorer and click the Import button. Add the fonts to the server so others can use them. Import only the fonts that were actually missing – don’t contaminate the server with excess fonts & duplicates!
There’s a lot more you can do with FontExplorer, including printing sample sheets. Look in the help menu for more information. Read complete documentation or watch a short video tutorial.
Learn more about graphics & media.