Nearly all hard drives and USB flash drives work with Mac, but many come formatted for Windows PCs. If you're planning to use the drive with both Macs and PCs, leave it in this state. Keep in mind certain files (such as older PostScript fonts) may be corrupted when you copy them to this volume. And Mac-specific functions such as Time Machine backups won't work.
If you will use a drive only on your Mac, you should reformat it in Mac format. Formatting a drive erases all contents forever, so transfer any files you need before continuing!
- Attach the drive to the USB, Firewire or Thunderbolt port and turn it on if it has a switch.
- If the computer offers to initialize it, click cancel.
- Copy any files you need from the drive to another disk before formatting.
- Click Finder (desktop). Then click the Go menu and choose Utilities. Open Disk Utility.
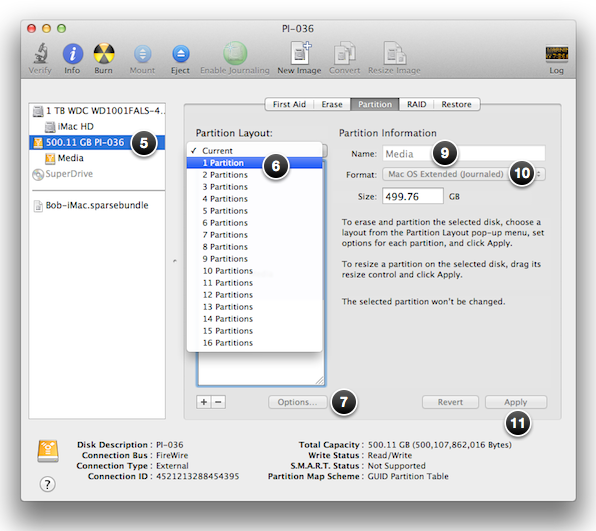
- Select the drive in the left column. You should click the size/brand of drive.
- Click the Partition tab. Under Partition Layout, choose 1 Partition.
- Click the Options button near the bottom of the window.
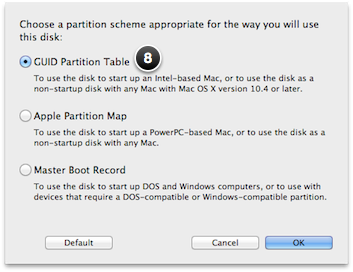
- Choose GUID Partition Table and click OK.
- Under Partition Information, type a name for the volume (such as Backup HD)
- Choose the format Mac OS X Extended (Journaled).
- Click the Apply button.
- Wait for the operation to complete, then quit Disk Utility.
- Look for the disk icon on the desktop, or click the Go menu and choose Computer.
Learn more about transferring files and backup.